Posts

Showing posts from April, 2018

Card Making with the Tag Punch Board

Image
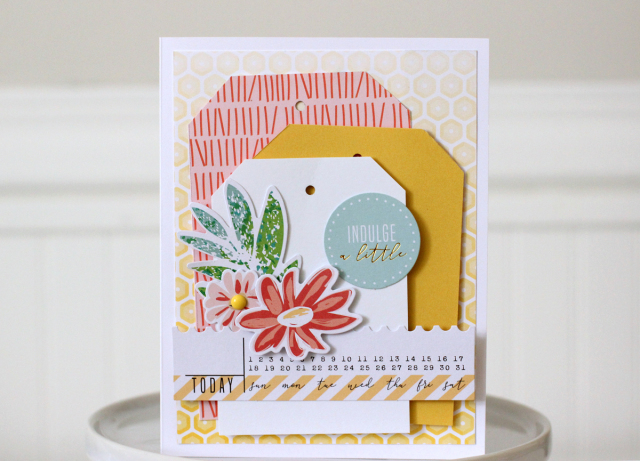
Hello everyone!!! Hope everyone has had a wonderful day thus far. Today we will be creating a very simple layered card but using some fun techniques. So let's get started to create a card with tag punch board . I always have a hard time getting the slopes on my tags to match, so this tool really comes in handy!   To create the tags, I chose gold, salmon and white cardstock in three different widths. Using the Tag Punch Board is as easy as lining the top of the tag and using the blade just like a regular trimmer. Flip the tag over, repeat the trim and you have a perfectly even tag every single time. It even includes a small hole punch tool for the top of the tags. This is so simple and quick that I made about a dozen tags in a few minutes. The background of the card is a very pale yellow ombre pattern. Then the three tags were layered with foam tape in a cascade. This creates a nice backdrop full of texture and color. The to finish off the card I used a variety of fl

How to Make Crepe Paper Flowers with Copic Markers

Image
Crepe-paper flowers capture the essence of flowers without all the botanical details, they add such delicate bloom. Crape flower are really a fun project. The happy part is u can color them by your own favorite color Copic marker . They are far more durable. Why Use Copic Various Ink? Although crepe paper comes in really cool colors, but adding these small bright color hues details gives them such a natural look. I experimented using acrylic and watercolor paint to add those extra details. Step 1: Cutting Out the Center Cut out a paper of 1.5x2 inch rectangle for the stamens and one for the pollen. Now fringe the stripes as finely as you can. To make your stamen put aside the off-white fringe, which will be your stamens. Working with just the gold strip, cut across the fringe in very small rows, perpendicular to your first set of cuts, to create a tiny gold confetti. That will become the pollen at the ends of the stamens. Step 2: Coloring the Center

Useful TIPS for successful stamping!

Image
Hello Crafter! We absolutely love stamping and it is something that is really easy and fun, Today I am excited to share with you some awesome stamping tips with few basic stamping tools . The tips and tricks will help you get started on your stamping journey, so let's get started. First, You can never master stamping at the very first attempt, it takes a bit of time to master. You don't just open the package and become an expert. It's definitely an exercise in practice makes better.  So, if you are a new stamper, practice when you can. Soon, you'll find it get easier and easier, and soon you’ll find you master things. You'll need a clear block which are available in many sizes, but you'll want to choose one that matches the size of your stamp.  You'll also need ink, and again there are many types of inks available, but you'll notice that people talk mostly about pigment ink, dye ink and chalk ink when discussing planner stamping

Slumber Party Invite

Image
Welcome back to the blog today! Sleepovers are super fun and planning for them are super amusement. So why don't invite your gang in an exceptional way this time? And that exceptional way is a sleepover invite this time. I’d love to share this ‘girl-powered’ sleepover invitation and banner I created with the new Trim and Score Board with you all. Untie the bright orange ribbon and this girly invite for my little one’s BFF, opens to reveal slumber party info… I’ve used a glittery pompom frame as the main embellishment on the front of the invites, I love the bright poping colour mixed with the softer pastel shades, so I used them as a combination. These gorgeous mismatched chipboard alphas are from Liesure Arts ‘Chart for less’ collection. The invitation consists of four large combined tags, which were created by folding a length of paper in quarters and then trimming the ends and punching, using the Tag Punch Board. Inside, there is a circular window area where

Printable Spring Scrapbook Page

Image
Scrapbooking is a creative alternative of displaying your photos and treasured moments, here today with a look at the Die Cuts with a View Wild Flourish paper pad . This one is full of brightly colored designs perfect for all of your Spring layouts. Let’s take a look at a designed printable spring scrapbook pages that are packed with pattern and spring vibrant color. This layout mixes four different patterns from the Floral Fusion collection from First Edition pad. My favorite is the pink floral. This floral fusion have 48 12×12 floral cardstocks which are perfect for the spring theme. To add emphasis to my photo, I used the Banner Punch Board to cut a banner shape into the pink floral paper. When layering patterns, be sure to choose an equal amount of large scale and small scale patterns, so you create uniform pattern. For example, the large pink flower pattern is complemented by the smaller light pink all-over pattern. That contrast lets each of the patterns shin

Butterfly Favor Boxes with Box Punch Board

Image
Hello everyone! We are always confused when it comes to wedding favors and packaging, small gifts often get neglected. Wedding favors aren't usually considered as part of the decor, but when they're packaged beautifully they definitely get noticed! So here today bringing you a quick favor box made with the Punch Board and the Butterfly Layered Stamp Set. For this favor box I used Punch Board to make a Small size box. All the instructions are already on the board so it is super easy! I started with a 6 inch paper to use my 12 x 12 inch paper completely. How cute is this polka dot cardstock from Kaisercraft Card Creations ?, Just visit Save Dollar Store and you will have lot of options to choose from! To have a cohesive look I choose the Layered Butterfly Stamp and made them in the same color as my box you can head with any of your choice . These new Acrylic Blocks come in three different sizes and have guides in the middle so you can align your stamps perfectl

Create Your Own Block Stamped Bookmarks

Image
Hello Friends, April is here and that means Mother’s Day and spring flowers are near! So this Mother’s day, to your rescue I bring to you a unique spring theme block stamped bookmarks . Also making stamped bookmarks is the perfect way to use up those smaller pieces of scrap cardstock. My bookmarks are two inches by six inches. The fun part about using stamps is you can layer them on your project to create an entirely distinctive look. When I am working with stamps that I will be stamping off the edge of my design, placing a piece of scrap paper under my cardstock. I use washi tape to secure both my bookmark and the alignment frame, to make sure that  nothing shifts. When using the stamps, start by placing your first stamp on the acrylic block. The acrylic block stamping set has three different sizes to make it easy to find one that will work with all your clear acrylic stamps. Apply black ink and place the stamp in the frame. Repeat this process with the rest of stam

Birthday Party Decor Ideas using my favorite DIY Party Board

Image
Creating your own party decorations not only saves you money but also allows you to create a personalized space. Whether it’s a child’s birthday party or a New Year’s celebration you can always to add in some DIY party decor. No matter what the occasion, roll up your sleeves and get ready to create your own adventure with a little help from these tutorials. I just planned a birthday party for my niece who just had a birthday. Her party theme? Trolls! Of course, I had to contribute to her mama’s party décor, I took help of my favorite DIY Party Board to make it perfect. First, I made party hats inspired by the character of Poppy. I started creating them by using the DIY Party Board to make hats out of pink cardstock. Then to add further details to it next, I put double-sided tape inside the bottom of the hat, then stuck several strips of 6” wide glitter tulle to the tape. I pulled the tulle up around the hat and secured it with a ribbon. To give the hats that extra “Poppy” touch